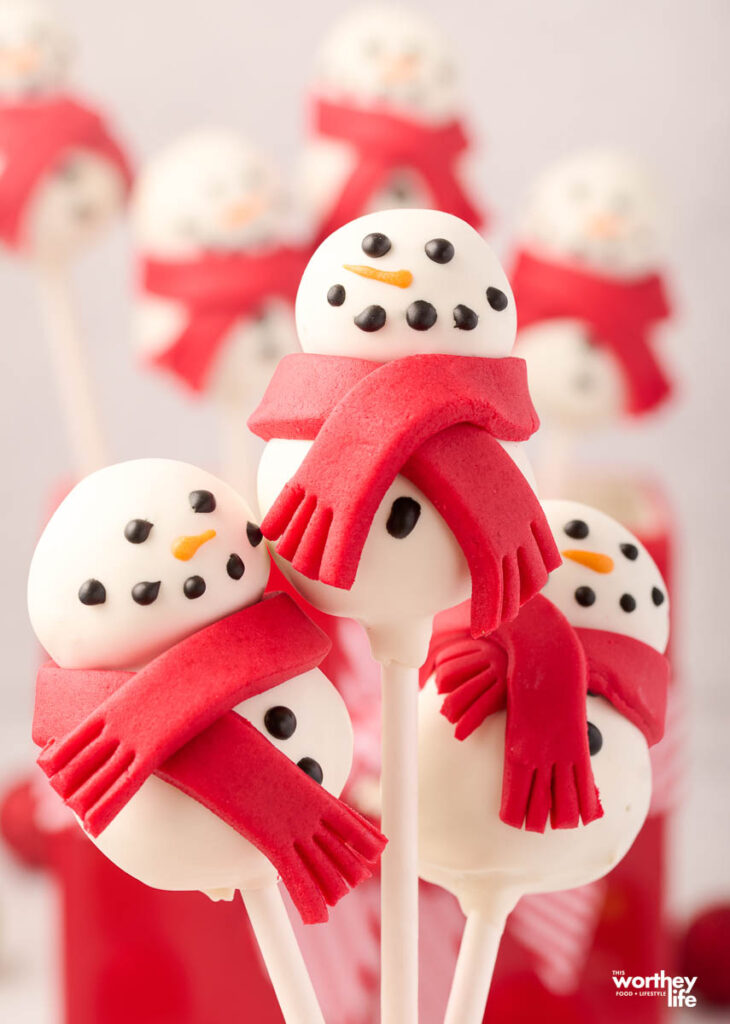
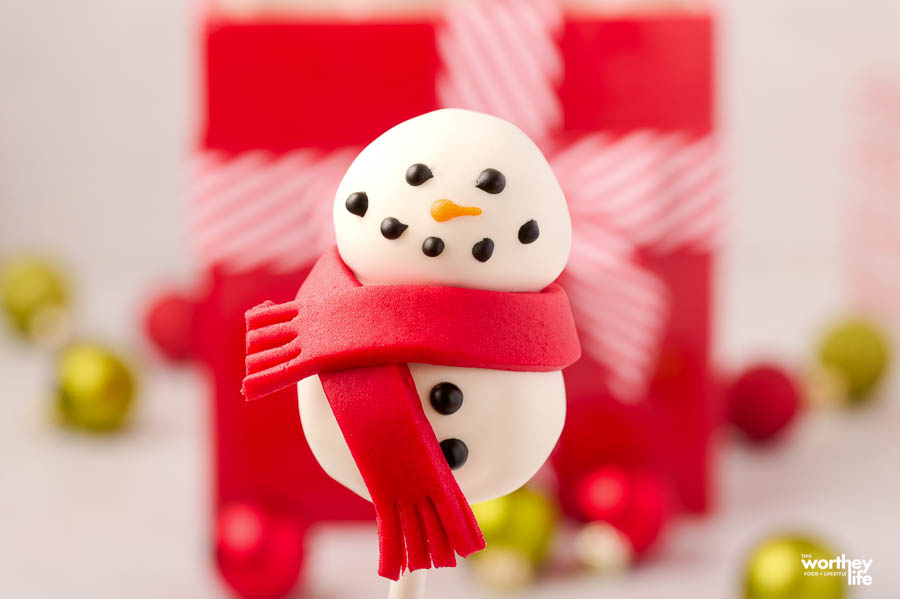
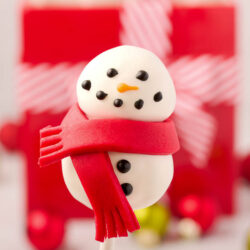
Baby, it is cold outside! Cuddle up with a warm hot chocolate and a snowman cake pop.
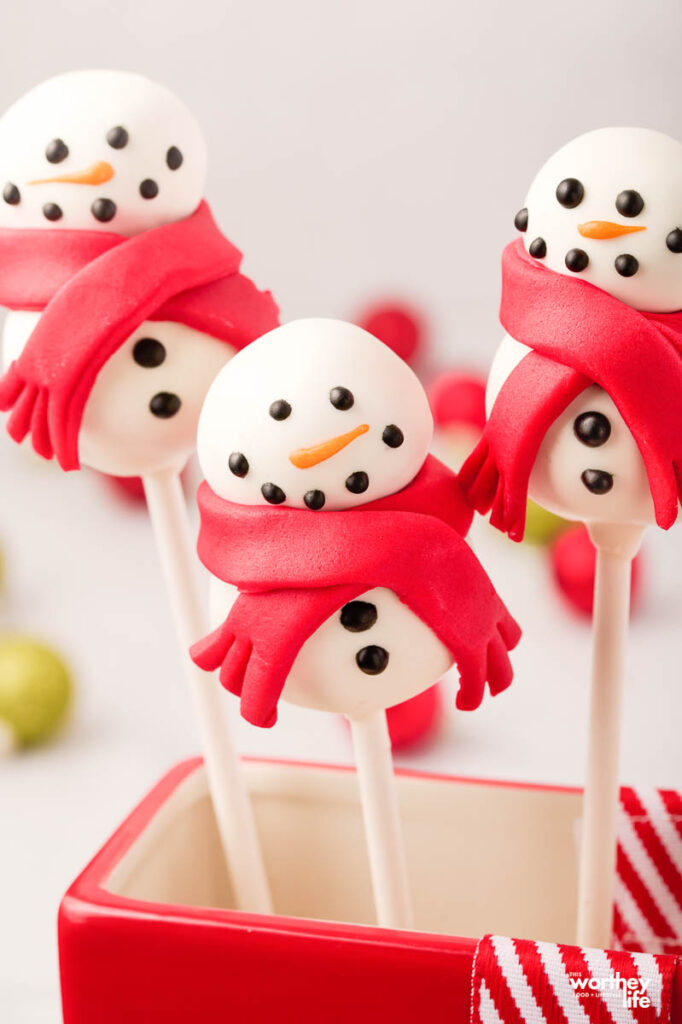
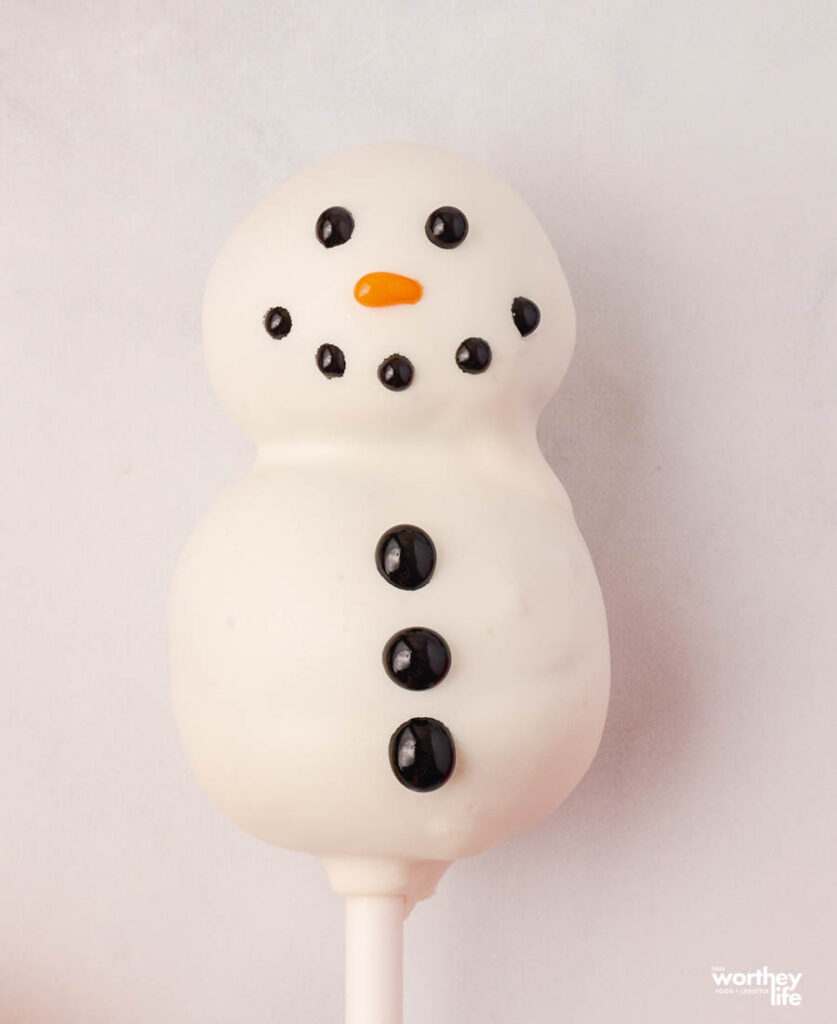
These snowman cake pops are delicious, dipped in white chocolate, and decorated with a fun red scarf and carrot-shaped nose.
It is a must-make Christmas dessert that kids and adults will devour.
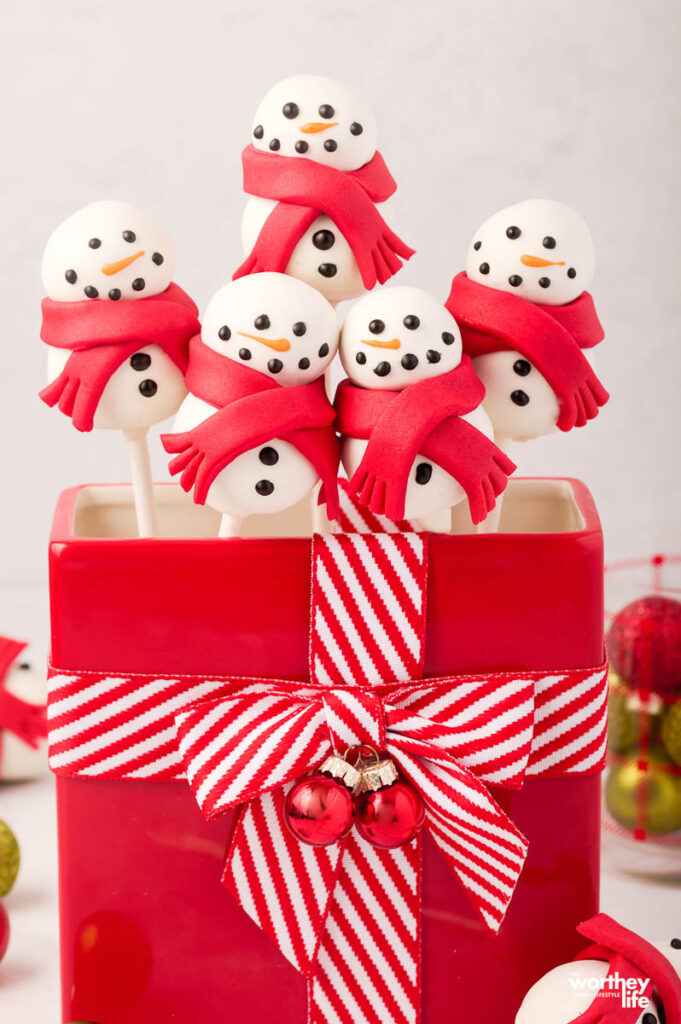
Snowman Cake Pops
The holiday season is here, and if you’re looking for a fun dessert idea for a holiday party or Christmas activity to do with the kids, try making these adorable Snowman Cake Pops.
Try these snowman ideas:
Chocolate Snowman Winter Board
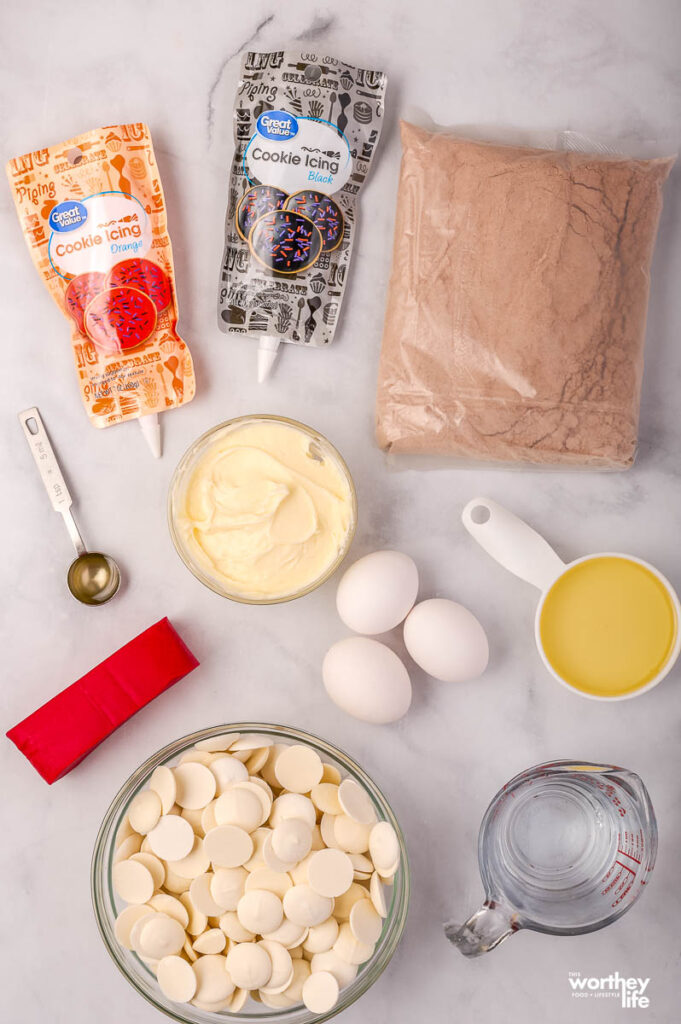
What You Will Need:
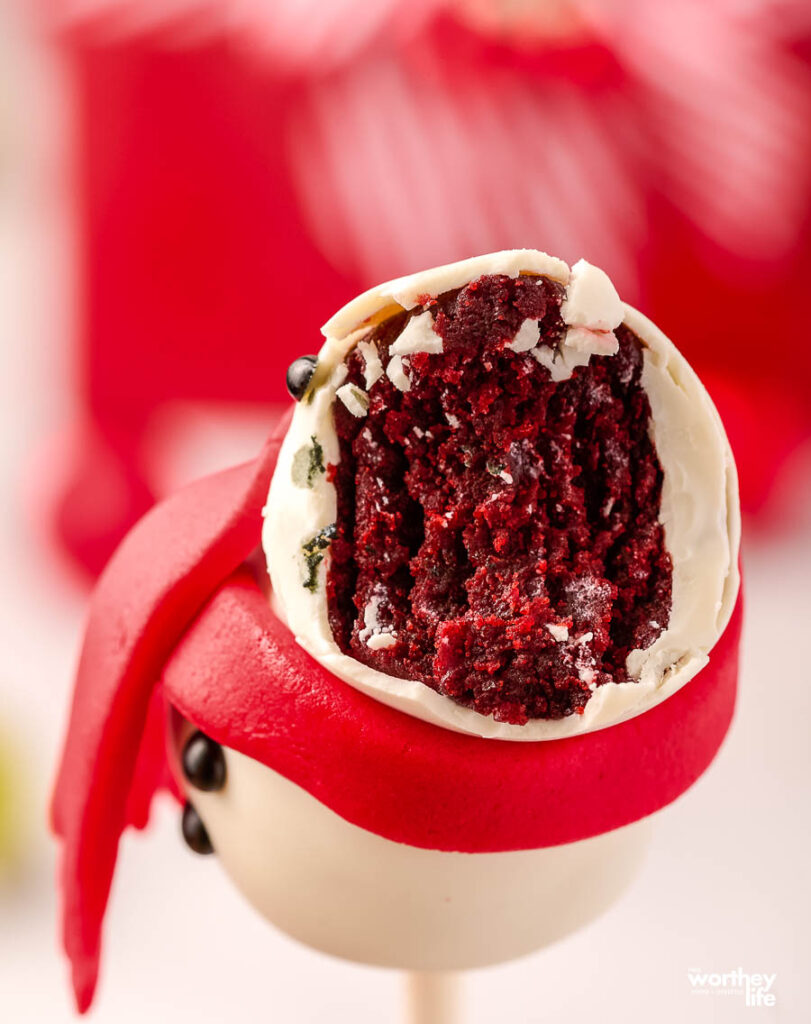
Red Velvet Cake. I used a red velvet cake. The red velvet is a nice touch to give this recipe a Christmas vibe. Feel free to use any variety of cake you would like. You will make up the cake of choice as directed in the recipe.
Cream Cheese Frosting. Cream cheese offers a rich and creamy flavor to the red velvet cake. It helps the cake stick and then roll into round balls.
White Chocolate. Candy melts work great as they quickly allow the chocolate to harden outside. This is important so you can create the snowman.
Oil. You will use oil to mix with the chocolate, giving it a shine to the chocolate as well.
Decorating. You will use red fondant for making the scarves and colored icing for the eyes and nose for the look of the cake pops.
How to Make Red Velvet Snowman Cake Pops
Prep Time: 1 hour
Bake Time: 35 minutes
Cooling Time: 30 minutes
Freezing Time:15 minutes
Total Time: 2 hours 20 minutes
Servings: 18 cake pops
Equipment:
- 9 x 13 baking dish or another baking dish for the cake
- Cake Pop Sticks
- Styrofoam block (or cardboard box)
- Rolling pin
Ingredients:
- 15.25-ounce red velvet cake mix, plus additional ingredients as called for on the box
- ½ – ¾ cup cream cheese frosting
- 4 cups white chocolate candy melts
- 1 teaspoon vegetable oil
- Black icing
- Orange Icing
- 6 ounces of red fondant
Directions:
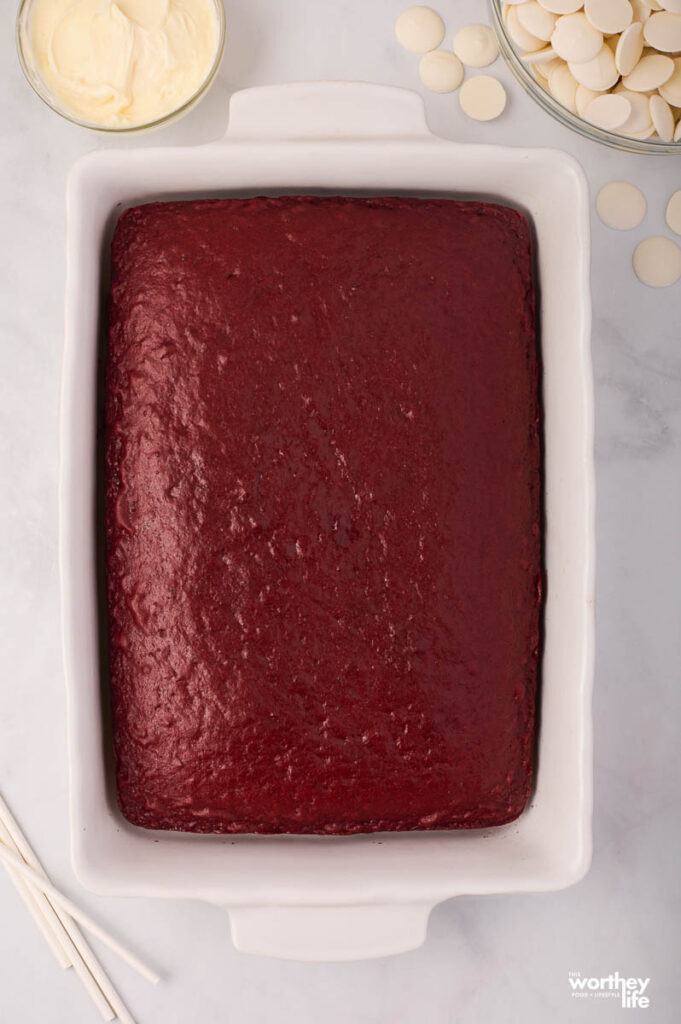
Bake the cake according to the box instructions. Let it cool completely.
Line a baking sheet with wax or parchment paper and set it aside.
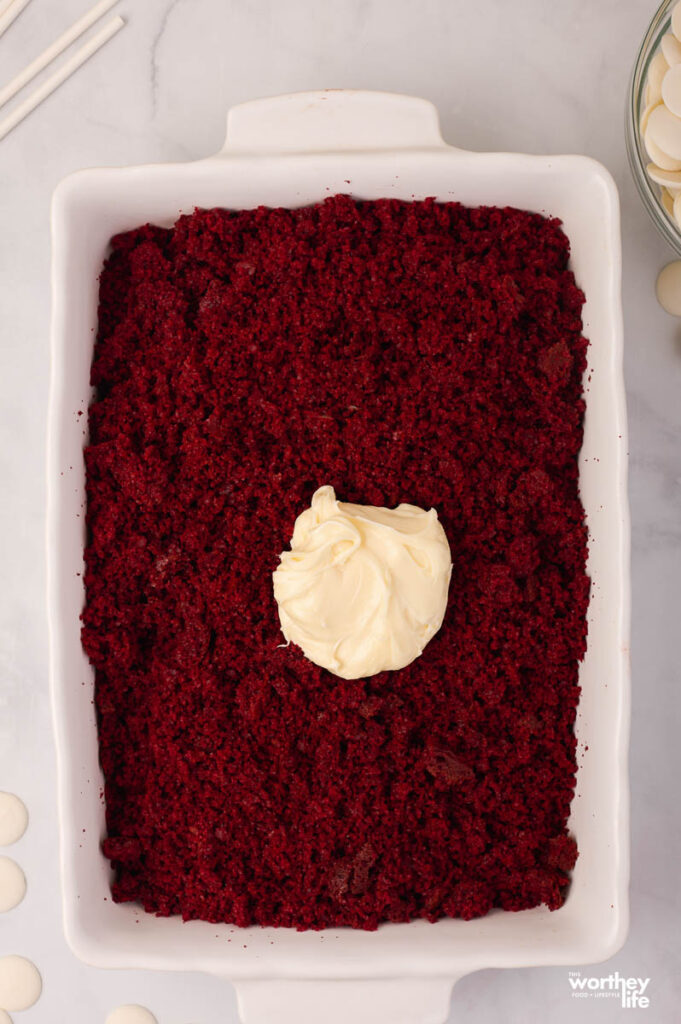
Once the cake has cooled, use your hands to crumble it. Add ½ cup of frosting and mix into the crumbles using your hands. Add one tablespoon more frosting at a time until you can easily roll the cake into a smooth ball.
Then, roll the cake mixture into balls: roll half into one tablespoon-sized ball and the other half into 1 ½ tablespoon-sized balls (there should be 18 of each, 36 in total). Place the balls on the baking sheet lined with parchment paper.
Once rolled out, place the baking sheet with the cake balls in the freezer for 15 minutes.
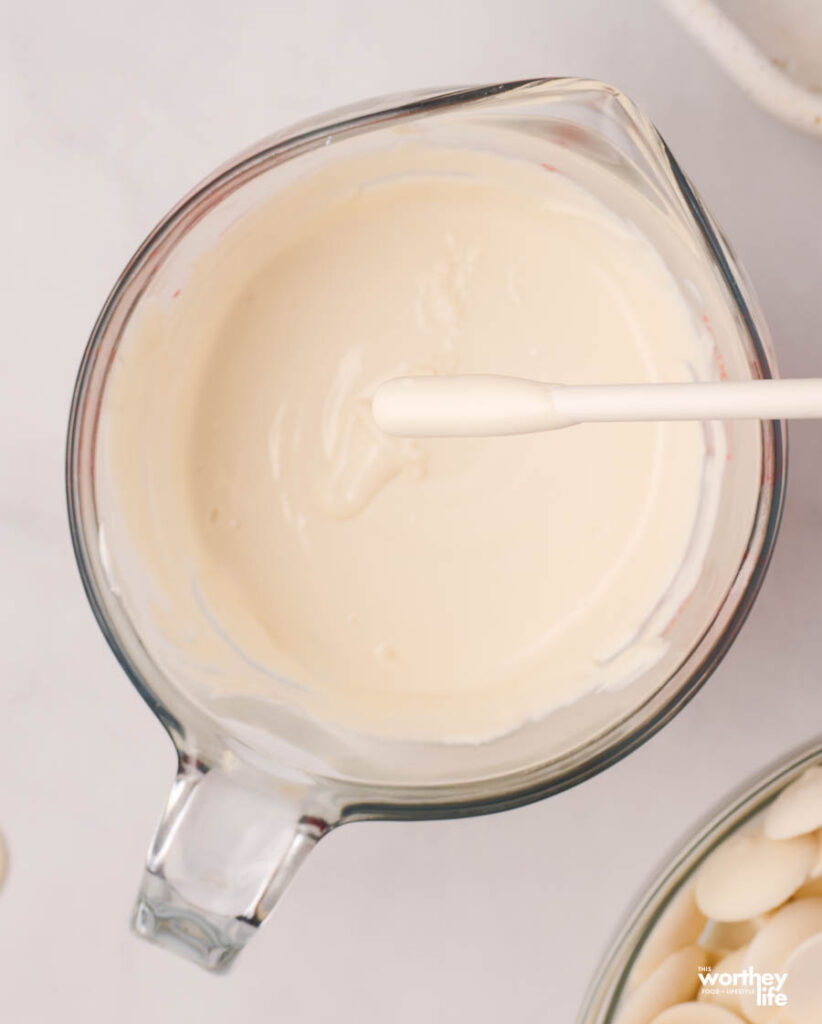
Add half the candy melts and vegetable oil to a two-cup measuring cup and microwave for 1 ½ minutes. Stir, and then microwave for an additional 15 seconds. Stir again until smooth. Microwave for an extra 15 seconds if needed.
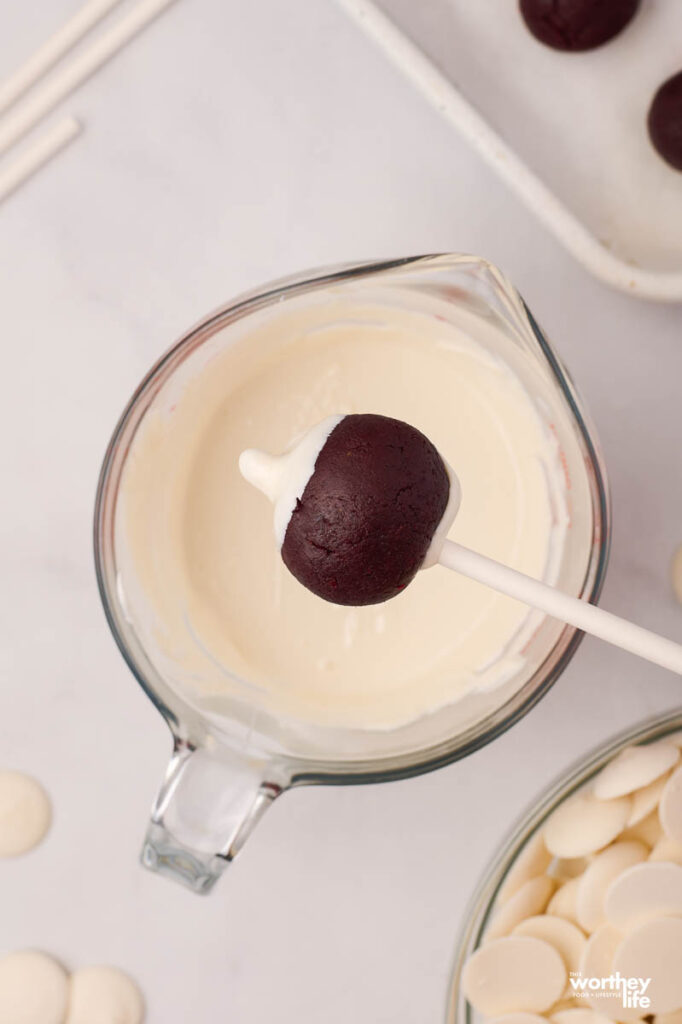
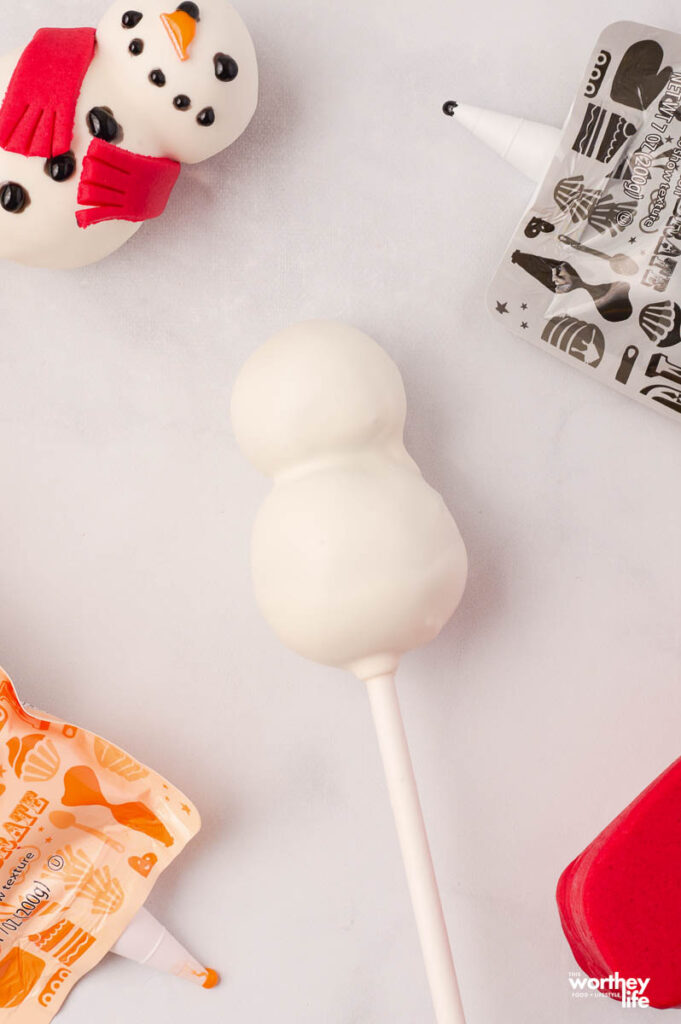
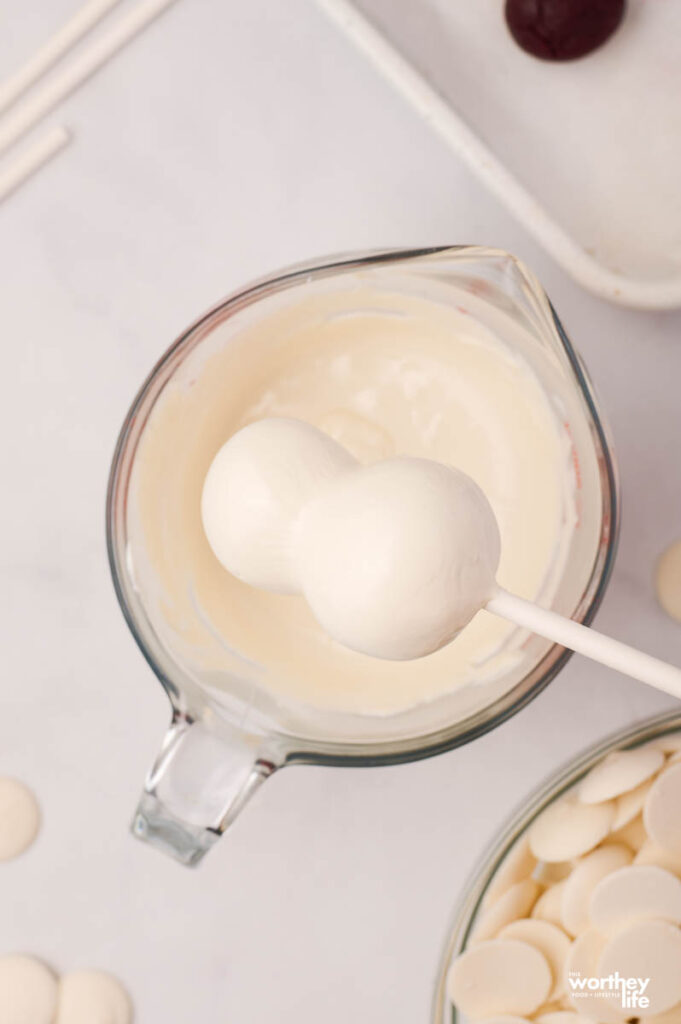
Dip ½ inch of the end of a stick in the candy melt. Then, insert it through the center of one of the larger balls, with ¼ inch of the stick popping through the top.
Dip again in the candy melt, coating the top of the stick.
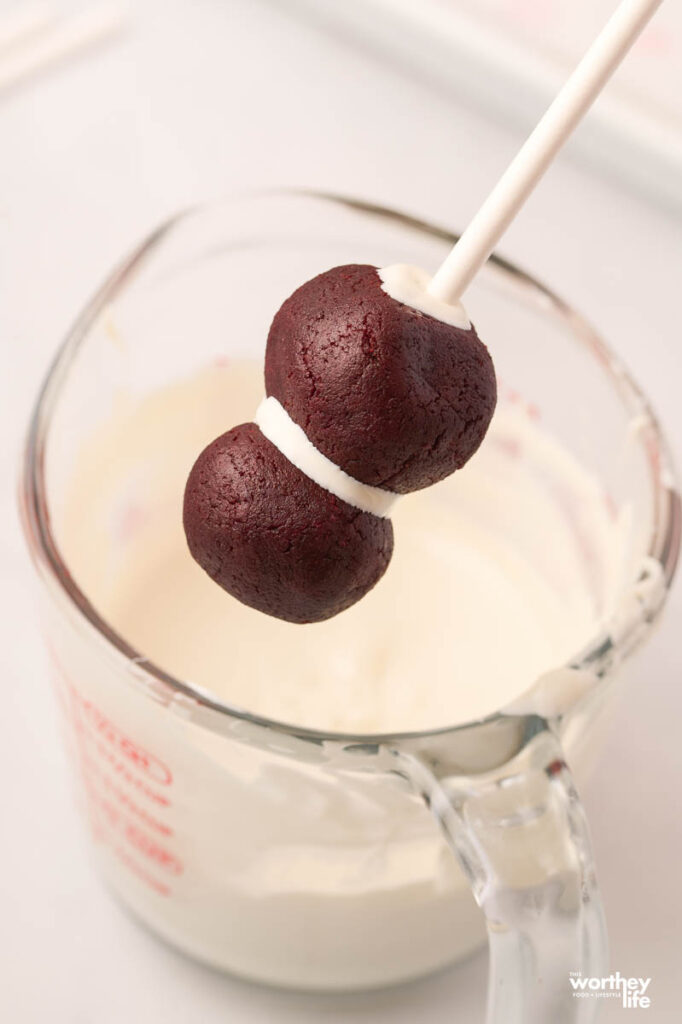
Top with one of the smaller balls.
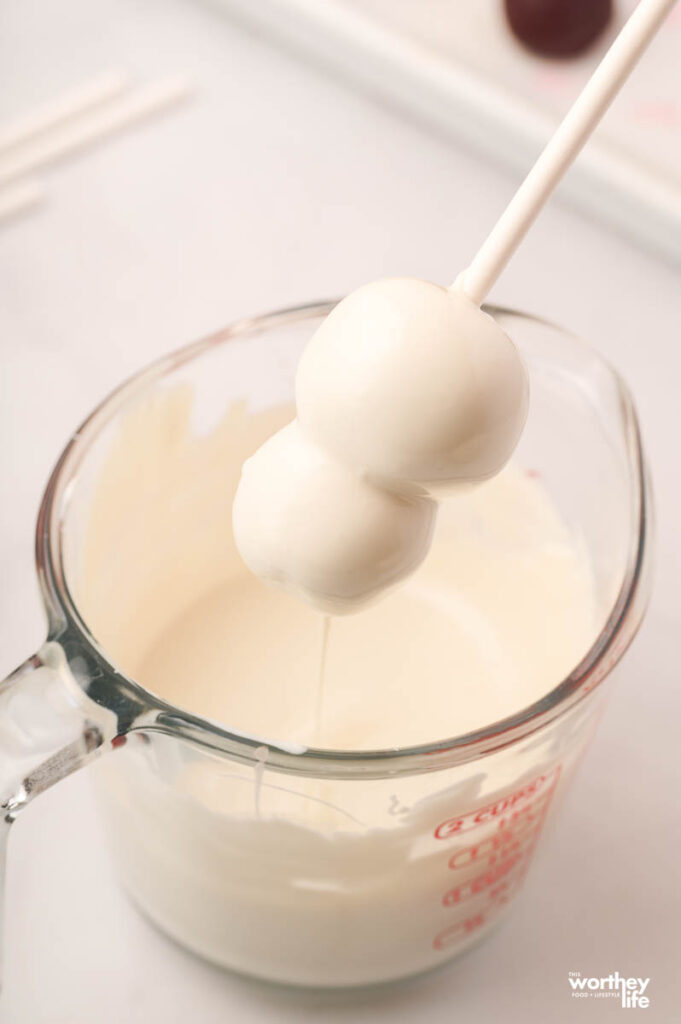
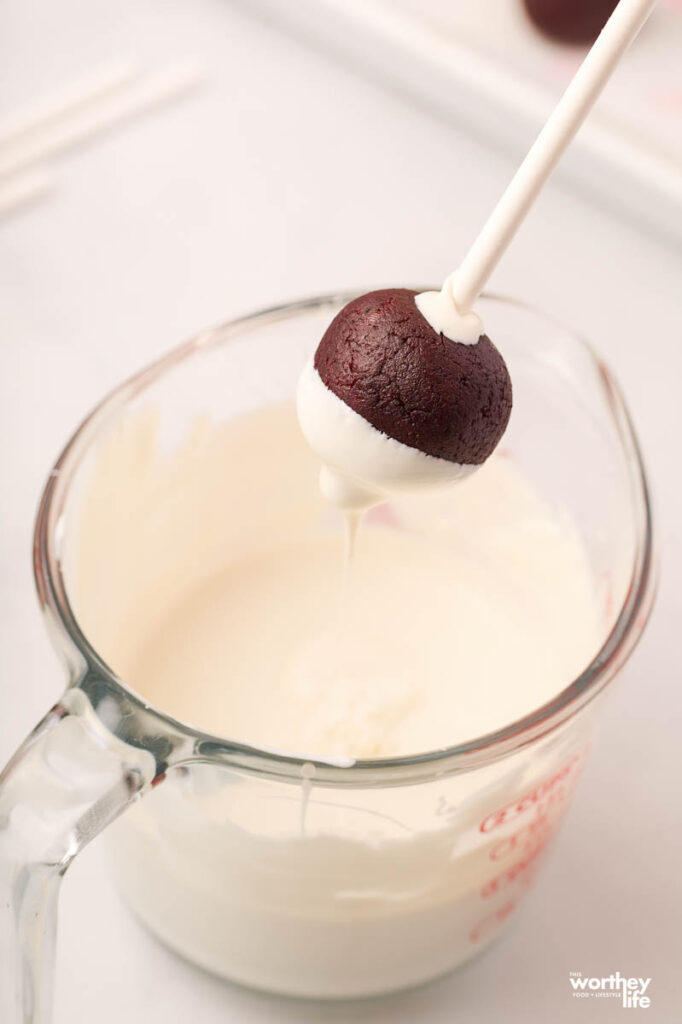
Submerge the cake pop fully into the candy melts. To remove the excess candy melt, gently tap the stick of the cake pop against the edge of your measuring cup while slowly twirling it.
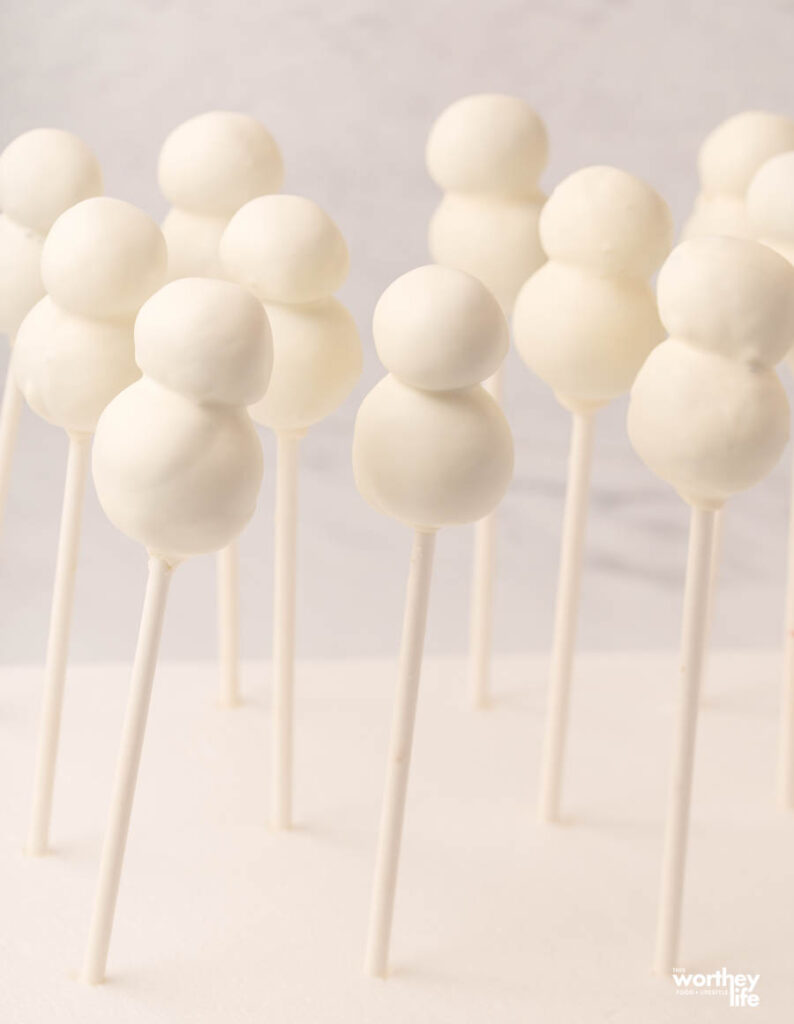
Then, insert the bottom of the cake pop stick into a styrofoam block to keep it upright as it dries and hardens. Repeat with the remaining cake pops. You’ll need to melt the second half of the candy melts in a clean or new measuring cup about halfway through.
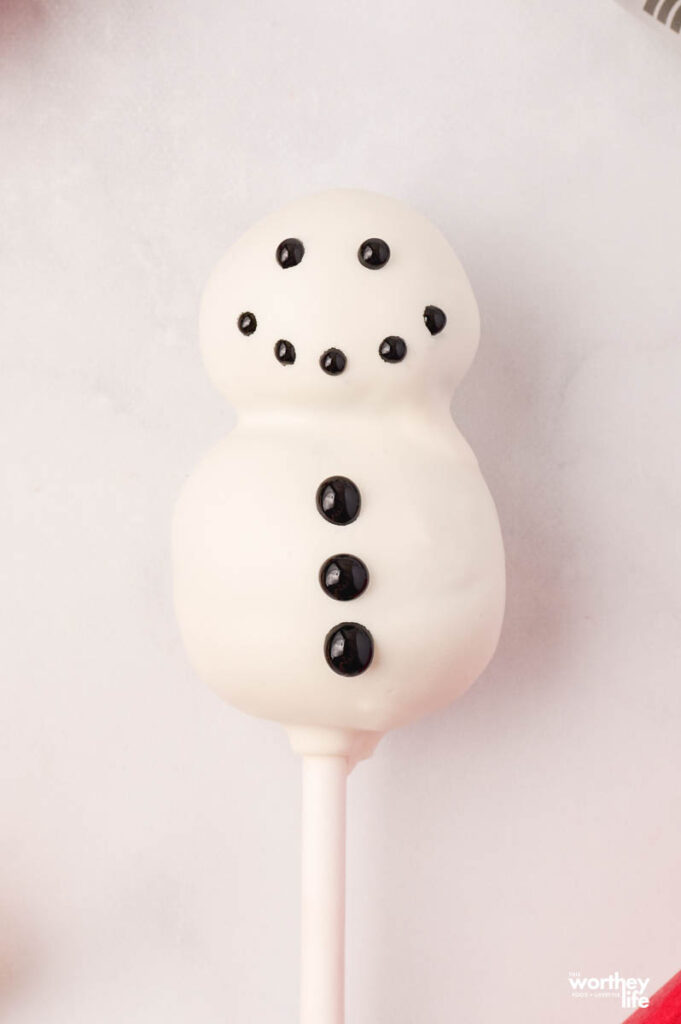
When you’ve finished assembling the last snowman, the first ones should be dry enough to draw on the eyes, mouth, and buttons with black icing and the nose with orange icing.
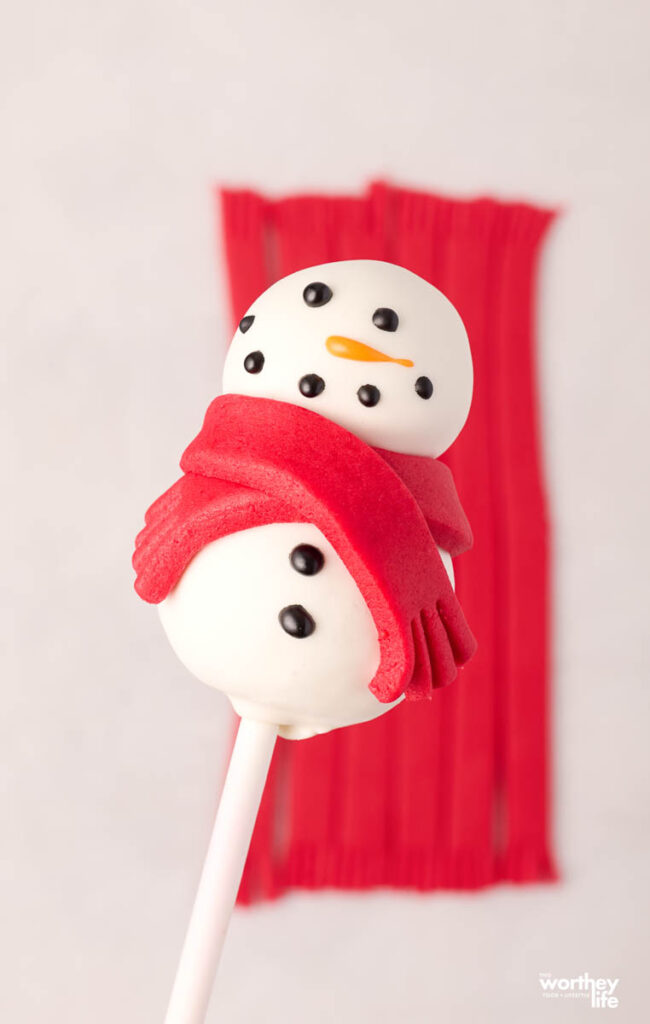
To make the scarf for your snowman:
Roll out the fondant to about ⅛ inch thickness and at least seven inches long. Cut into ½-inch wide strips.
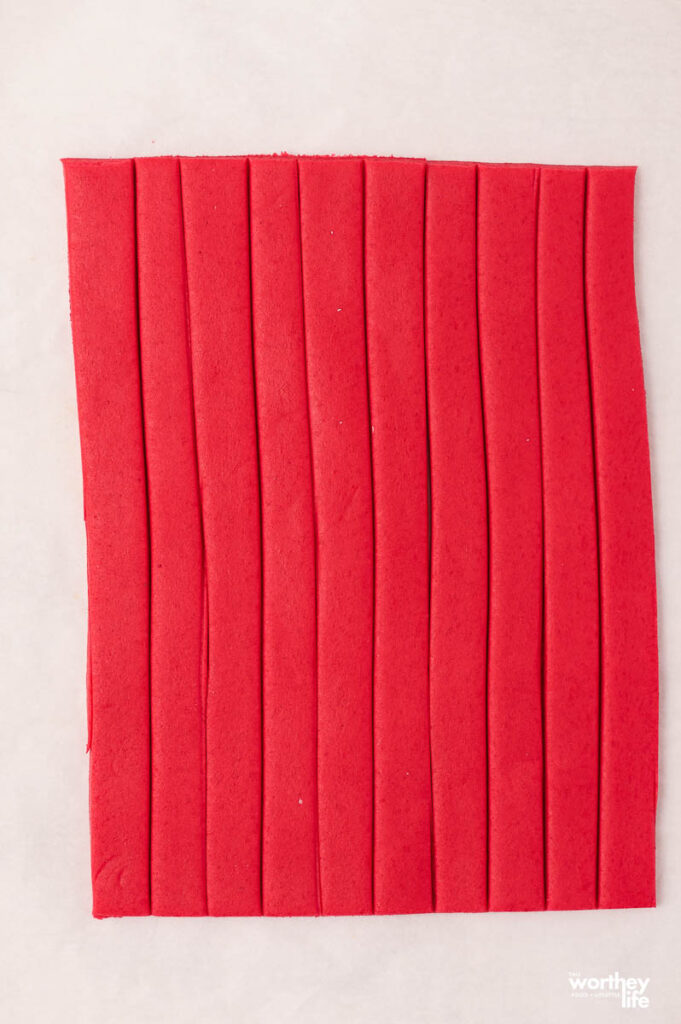
Trim the edges so that you have ½-inch wide by 7-inch long strips.
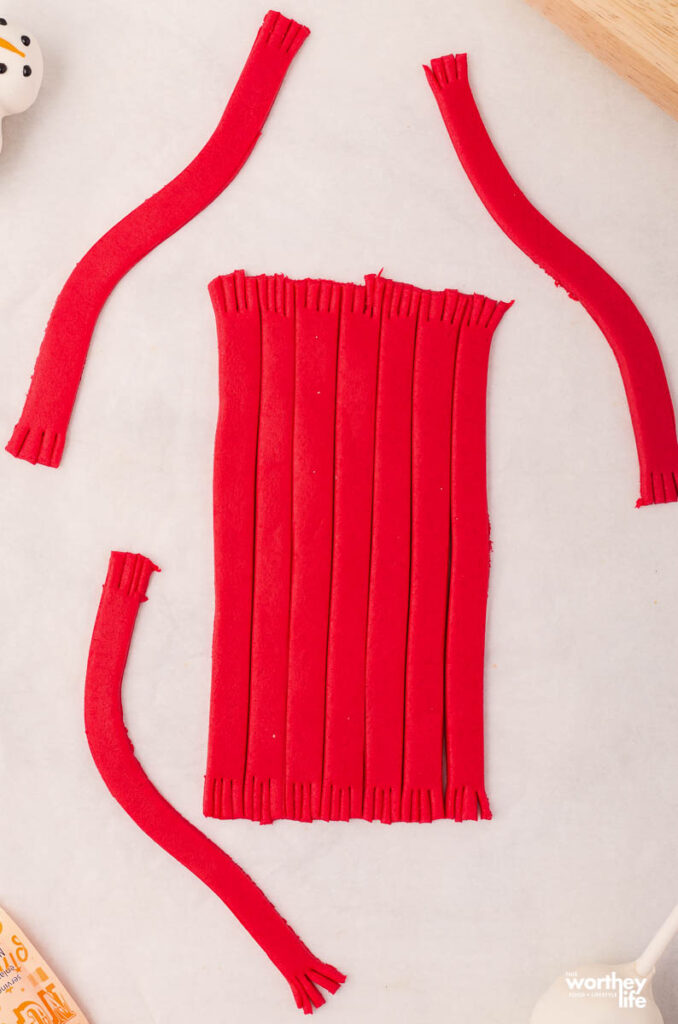
Then, create the scarf fringe by cutting three small lines at both ends of the strip.
Wrap each strip around a snowman styled as a scarf. Ball and roll out the fondant scraps, repeating until each snowman has a scarf.
Additional Tips:
- Create a “melting” snowman by placing the stick at the top of the snowman’s head and letting it harden sitting on parchment paper so that the candy melt pools out at the bottom and it looks like the snowman is melting.
- You can also simplify the snowman by rolling out a single 1 ½ tablespoon-sized ball per cake pop and drawing on the snowman’s eyes, mouth, and nose.
Storing Cake Pops
If using cream cheese frosting, these cake pops must be stored in the refrigerator in an airtight container. However, if you use a vanilla buttercream or one made with room temperature-safe ingredients, you can leave the cake pops on the counter for 3 – 5 days.
Otherwise, store it at room temperature if it is a frosting that does not require refrigeration.
These cake pops can be frozen as well. Just place it in a freezer container or bag. Then, freeze for up to 3-4 months.
Thaw some in the fridge overnight or at room temperature when you want to eat one or two.
How do you know you have enough frosting in the cake?
So when you mix the cake with the frosting, you want it to create a dough that holds together if you press it together.
It will have a similar texture to a play dough. So feel free to add less or more frosting to the mixture. You will find it all depends on the texture of the cake.
Add up to three additional tablespoons of frosting to the cake crumbles to get a pliable cake dough. I found ½ cup + 1 tablespoon of frosting to be the perfect ratio but would allow up two more tablespoons.
The key indicator that you have enough frosting added is the ability to roll the cake into smooth balls that will hold their shape. If it falls apart when you pierce it with the cake pop stick, you may need to add more frosting.
It will be OK if you have to crumble and ball the cake if more frosting is needed – this happened once during testing. Just pop them back in the freezer for another 15 minutes!
What happens if my white chocolate begins to harden up?
If your chocolate hardens, toss it back in the microwave to re-melt.
Or, if you have a double boiler, use that to keep the chocolate at the right temperature as you work your way through dipping all the balls.
What do you do with the excess chocolate on the cake balls?
Make sure to gently tap the cake pop against the side of the measuring cup.
A gentle tap as you twirl it will remove the excess candy melt easier than just letting it drip off, but a gentle tap is critical.
Tap too hard, and the cake pops may split or fall apart.
Before coating the cake balls with candy melt, gently squeeze them to secure them on the cake stick.
Can I use chocolate chips instead of candy melts?
Reach for white chocolate chips and add one tablespoon of shortening to the mixture.
Then, as the chocolate melts, the shortening will help the chocolate set up like candy melts.
Feel free to use any white chocolate you would like.
Do edible pens work for drawing on the face of the snowman?
I also tried drawing on the snowman’s face with decorating gel and Wilton’s Candy Melt Writing Pen.
While I did find the gel more manageable to apply, its appearance was noticeably thinner than icing and didn’t look as good. I can’t recommend the writing pen; it didn’t work well.
You are welcome to try it out, but I found gel worked best, and you buy it in a little tube so it pipes nicely.
What if I don’t have styrofoam to place Snowman Cake Pops on?
You can also stick the cake pops in a cardboard box if you don’t have a styrofoam block.
I poke holes in the cardboard, and then you can place each cake pop into the cardboard.
It will hold the cake pops up. Just make sure to leave space between each one so that they don’t touch each other.
More Tips For Success
- I used Betty Crocker’s red velvet cake mix and cream cheese frosting. The box ingredients and instructions also call for one ¼ cup water, ½ cup vegetable oil, and three eggs to make the cake. The additional ingredients may vary depending on which cake mix is used. Or, link to a red velvet cake recipe on your site.
- I followed the instructions for making the cake in a 9 x 13 baking dish, which takes about 5 minutes to mix and 35 minutes to bake.
- You can write the instructions to say to move the cooled cake into a mixing bowl to crumble and mix with the frosting.
- If you freeze the cake pops longer than 15 minutes, give them a few minutes on the counter to warm up. The contrast of the cold from the freezer and the heat from melting the chocolate can cause the cake pops to crack as the candy melt hardens on the cake pops if the difference between the two temperatures is too great.
- I suggest using a two-measuring cup for the candy melts because it provides a good depth for submerging the snowman.
- IMPORTANT TIP! You’ll need to refill the measuring cup with candy melts about halfway through. Do not add the new candy melts on top of the remainder of the first half. Clean out the cup or use a new one for the second half. If you microwave the remainder of the already melted chocolate with the new candy melts, the remainder will harden instead of melting.
- It’s also essential to immediately remove any cake crumbs falling into the candy melt while dipping the snowmen.
More Christmas Ideas:
Christmas Tree Buttercream Board
Edible Snowman Cake Pops - Red Velvet Cake Pops
Ingredients
- 15.25- ounce red velvet cake mix plus additional ingredients as called for on the box
- ½ - ¾ cup cream cheese frosting
- 4 cups white chocolate candy melts
- 1 teaspoon vegetable oil
- Black icing
- Orange Icing
- 6 ounces of red fondant
Instructions
- Bake the cake according to the box instructions. Let it cool completely.
- Line a baking sheet with wax or parchment paper and set it aside.
- Once the cake has cooled, use your hands to crumble it. Add ½ cup of frosting and mix into the crumbles using your hands. Add one tablespoon more frosting at a time until you can easily roll the cake into a smooth ball.
- Then, roll the cake mixture into balls: roll half into one tablespoon-sized ball and the other half into 1 ½ tablespoon-sized balls (there should be 18 of each, 36 in total). Place the balls on the baking sheet lined with parchment paper.
- Once rolled out, place the baking sheet with the cake balls in the freezer for 15 minutes.
- Add half the candy melts and vegetable oil to a two-cup measuring cup and microwave for 1 ½ minutes. Stir, and then microwave for an additional 15 seconds. Stir again until smooth. Microwave for an extra 15 seconds if needed.
- Dip ½ inch of the end of a stick in the candy melt. Then, insert it through the center of one of the larger balls, with ¼ inch of the stick popping through the top. Dip again in the candy melt, coating the top of the stick. Top with one of the smaller balls. Submerge the cake pop fully into the candy melts. To remove the excess candy melt, gently tap the stick of the cake pop against the edge of your measuring cup while slowly twirling it.
- Then, insert the bottom of the cake pop stick into a styrofoam block to keep it upright as it dries and hardens. Repeat with the remaining cake pops. You'll need to melt the second half of the candy melts in a clean or new measuring cup about halfway through.
- When you've finished assembling the last snowman, the first ones should be dry enough to draw on the eyes, mouth, and buttons with black icing and the nose with orange icing.


Leave a Reply